Add a new Live event and registration page
In this article we’ll show you how to add/create a new Live event and it’s corresponding promo & registration page.
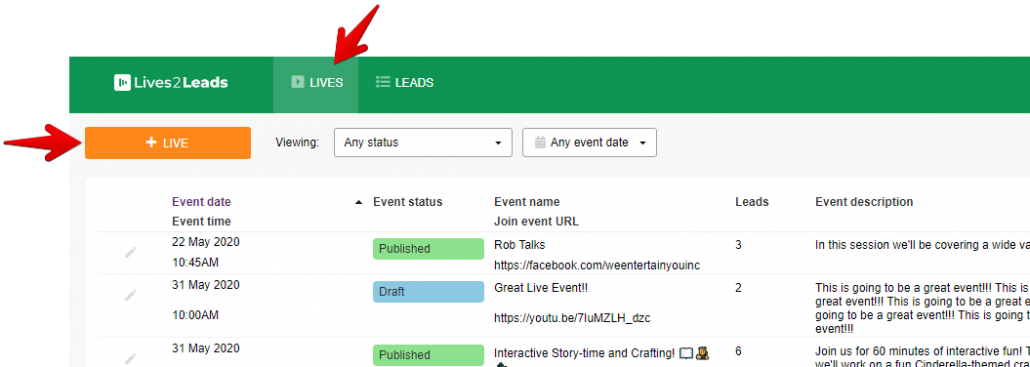
Step 1: Go to LIVES and click the orange + LIVE button
Step 2: Fill in the “DETAILS” section
We go through this tab section by section…
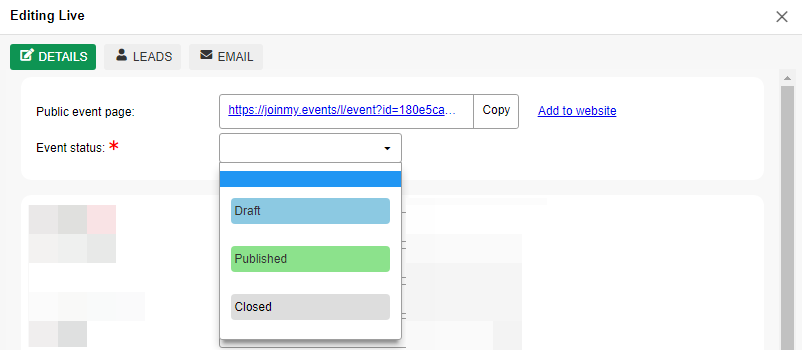
In this top section you’ll find:
- Public event page: This is the URL you can use to promote your event and get people registering. Simply click the “Copy” button to quickly and easily grab this link.
- Event status: You have three statuses to choose from:
- Draft – not viewable
- Published – can be shared and viewed
- Closed – event promo and registration page is still published, however the registration section is replaced by a note saying the event is now “Closed” and cannot accept more registrants
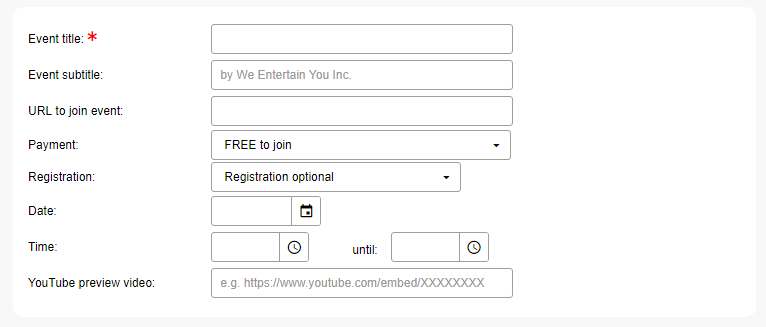
In this next section you’ll be adding details about your event, here you’ll find:
- Event Title
- Event Subtitle
- URL to join event – this is the link you want your leads directed to at the time of your event (e.g. your Zoom link, Facebook page, etc)
- Payment – here you can choose if the event is ‘FREE to join’ (which will display a big “FREE” label on your page) or ‘Payment Required’ (No label displayed on page). NOTE: For any events that require payment you must arrange payments outside of Lives2Leads with any system of your choice
- Registration – there are 3 options here…
- Registration Optional – connection details will be displayed publicly on your event pages
- Registration Required – details are hidden and will be sent to your leads via email as soon as they register
- Approval Required – details are hidden and leads must be manually approved by you before they can access your event
▶ NOTE: Learn how to use the different Registration options to add a huge layer of extra security to your events AND to even use Lives2Leads for your PAID events!
- Date
- Time – in your local time zone
- YouTube preview video – if you have a preview of your event you want to share on your event pages, simply include the url of the youtube video you’d like to use
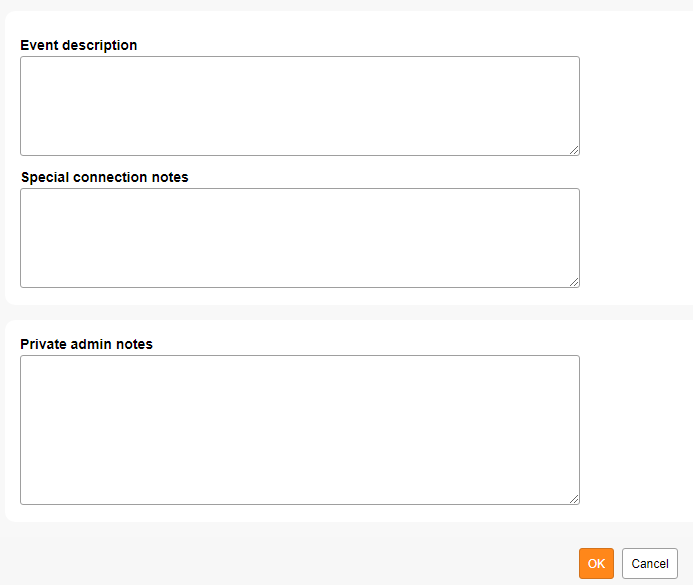
In this last section you have…
- Event description – Here you can include a longer form description of your event. By default, on your event page, only the first line of the description will show and visitors will have a “more” button that expands the section to show the full details.
- Special connection notes – If you have any special notes you feel are important to include along with the link to join your event to help guide your leads on how to join (for example, a password to join) this is a great place for it. NOTE: when applicable, these notes are not visible to leads until they’ve registered or are approved.
- Private admin notes – These notes are just for you! They will never be seen by your leads.
Step 3: Click “OK” to save your changes
You may have noticed that at the top of your Live Event Editor there are two more tabs: “LEADS” and “EMAIL”.