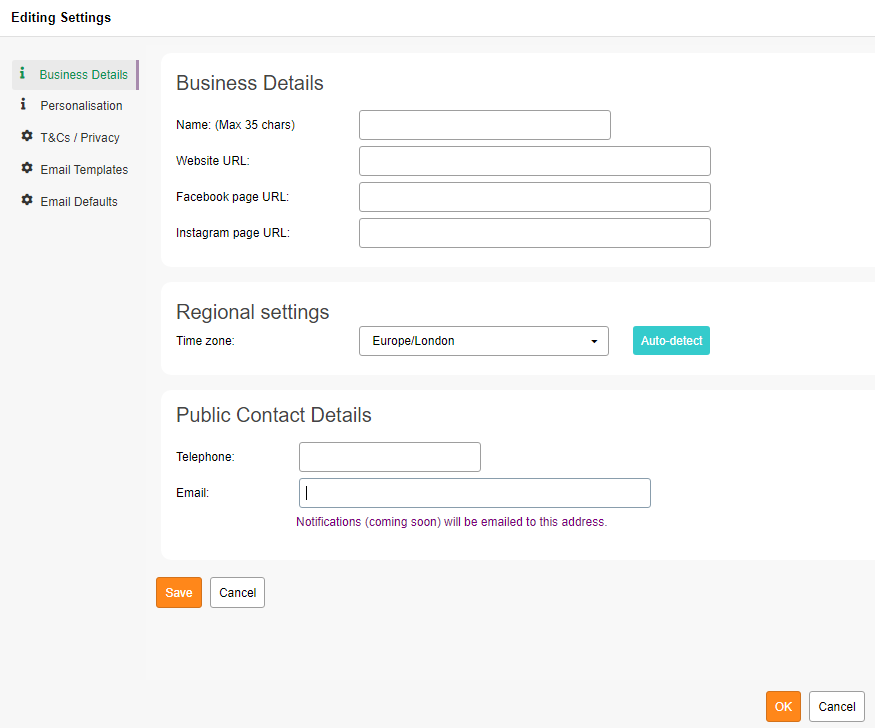
To add Facebook Pixel and Google Analytics tracking to your Lives2Leads pages…

Step 1: Go to “Settings”

Step 2: Go to “Business Details” and scroll down to “Tracking & Remarketing” section
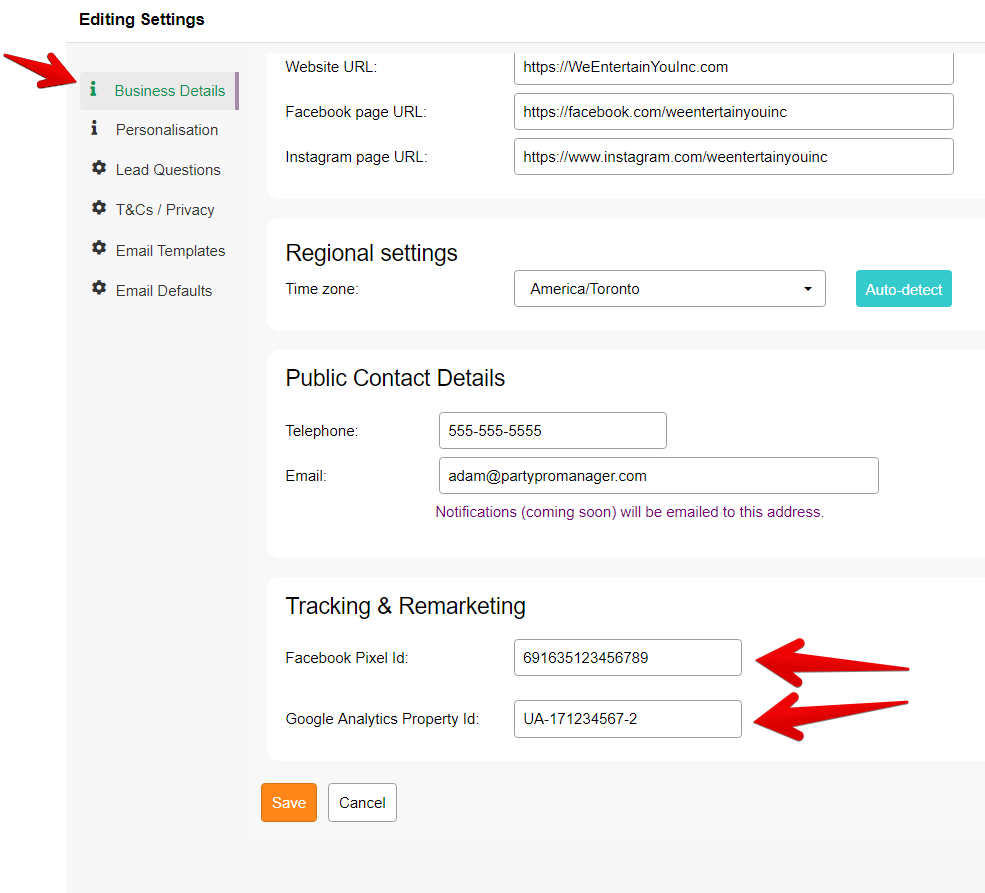
Step 3: Add your “Facebook Pixel ID” and your “Google Analytics Property ID”

Be sure to “Save” your changes.

Your tracking codes are now all set!

Once these codes are active, you’ll see data populating from your Lives2Leads account into your Facebook Ads Manager and your Google Analytics account.

In Facebook’s Events Manager, you’ll start to see new events being tracked:
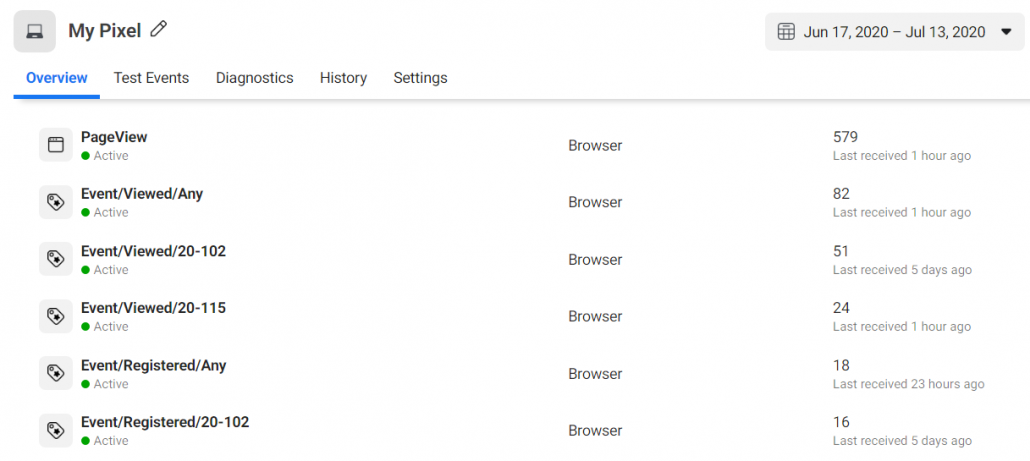
  • “Event/Viewed/Any” = pixeled data for any/all leads that have viewed ANY of your Lives2Leads event pages
  • “Event/Viewed/##-###” = pixeled data for any/all leads that have viewed a specific event. In this case, the “##-###” will refer to the “Event ref”, which can be found on your Lives page or within the details of any given Live
  • “Event/Registered/Any” = pixeled data for any/all leads that have registered for ANY of your Lives2Leads event pages
  • “Event/Registered/##-###” = pixeled data for any/all leads that have registered for a specific event. In this case, the “##-###” will refer to the “Event ref”, which can be found on your Lives page or within the details of any given Live

In Google Analytics you’ll see new page views being tracked and they’ll look something like this:

In this case the “page” name corresponds with the public link you’d be sharing with people to view your event page.

You can find this link while viewing editing the details of your event in the Lives2Leads admin dashboard.

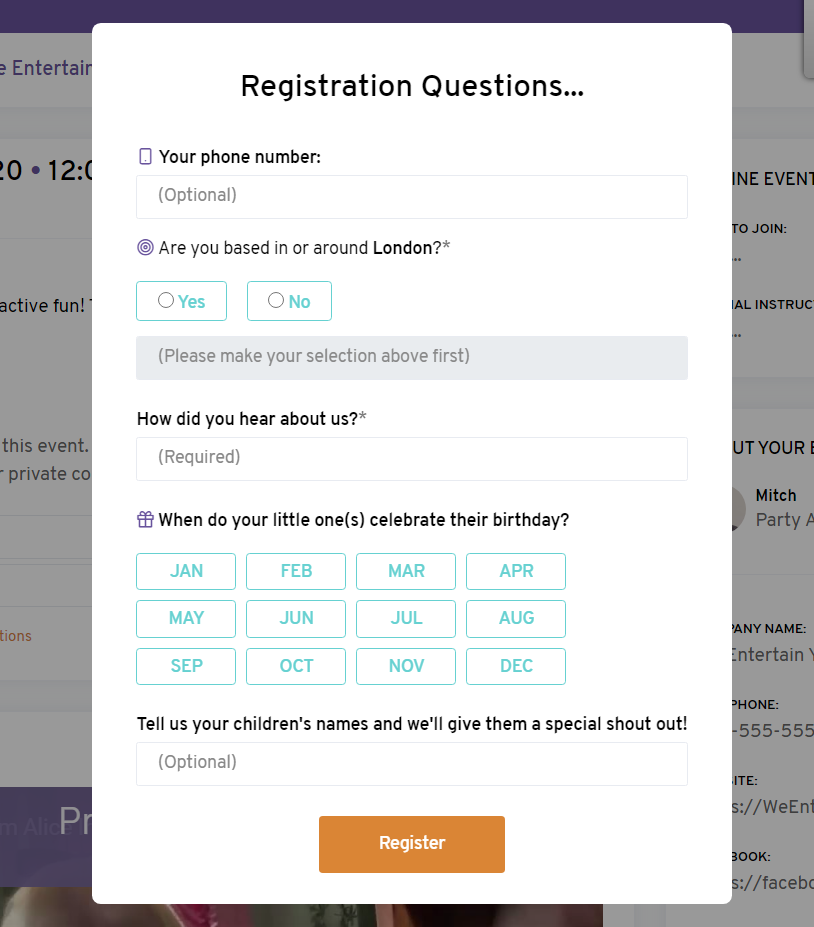
When leads register for your event, they provide you with their name and email. But, what if you want more info about your leads? You can do that too!

With our Leads Questions feature, in just a few clicks you can also collect:

  • Phone Number
  • How they heard about you
  • Where they are located
  • Their children’s birthday months
  • And more!

How to set it up…

Step 1: Go to “Settings”

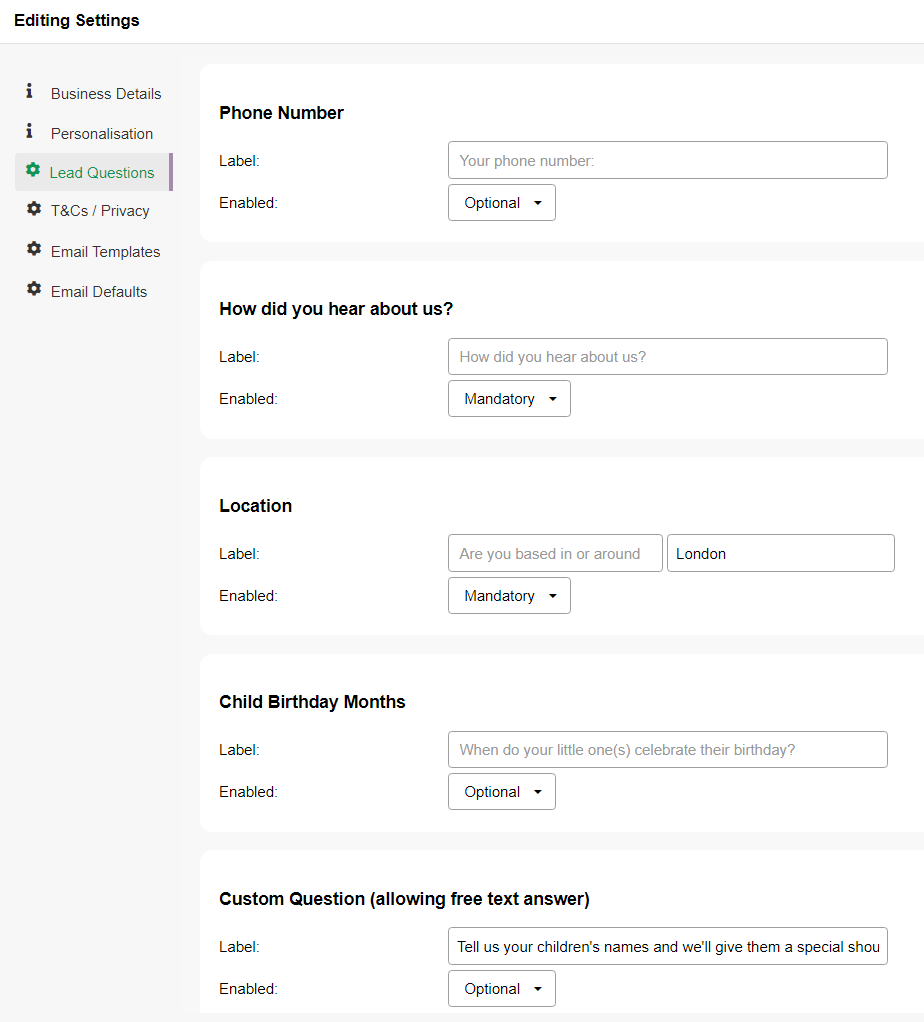
Step 2: Go to “Lead Questions” and make any adjustments you require

You can choose to make any of the questions “Optional”, “Mandatory” or for it to be “Not displayed” entirely.

There is even a spot for a “Custom Question” if you need to ask something we don’t already have covered for you!

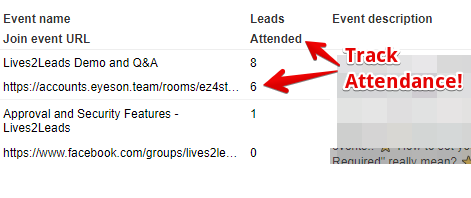
Lives2Leads now helps you track event attendance. And the coolest part, it’ll track it automatically for you!

HOW IT WORKS:

  • New Lead registers for your event
  • Lives2Leads sends them a personalized/unique connection link
  • Their personal link will NOT forward them to the actual live stream link until it is within 30 minutes of your set start time
  • If/when they go to their personal connection link within that 30 minute window, they will be redirected to your actual live stream link
  • AND… Lives2Leads will then mark them as “attended”
  • Boom! 💥

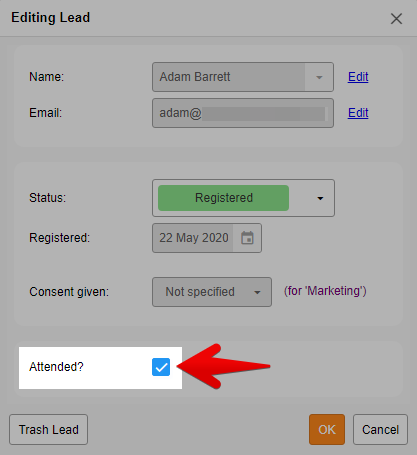
You can also manually set a lead as “attended” or reset them to “not attended” by opening the Lead from your leads list for that particular event.

With attendance tracked, this now makes it possible for you to send additional, unique emails to more targeted segments of your lists of leads.

And, of course, the attendance status will be exported along with the leads data when you export your list of leads for any particular event 🙂

Keeping unwanted intruders out of your live streaming events is important. Lives2Leads provides you with a huge layer of extra security to ensure your events are safe!

In this video you’ll get a “live” tour of:

  • How Lives2Leads can be used for PAID events!!
  • How to set your events for “Approval Required”
  • What does “Approval Required” really mean?
  • How Lives2Leads gives a HUGE extra layer of security for your live events
  • How to revoke access to a live event for a lead that was previously approved
  • Why would you want to revoke access anyway?
  • And more!

SEE THESE SECURITY FEATURES IN ACTION!

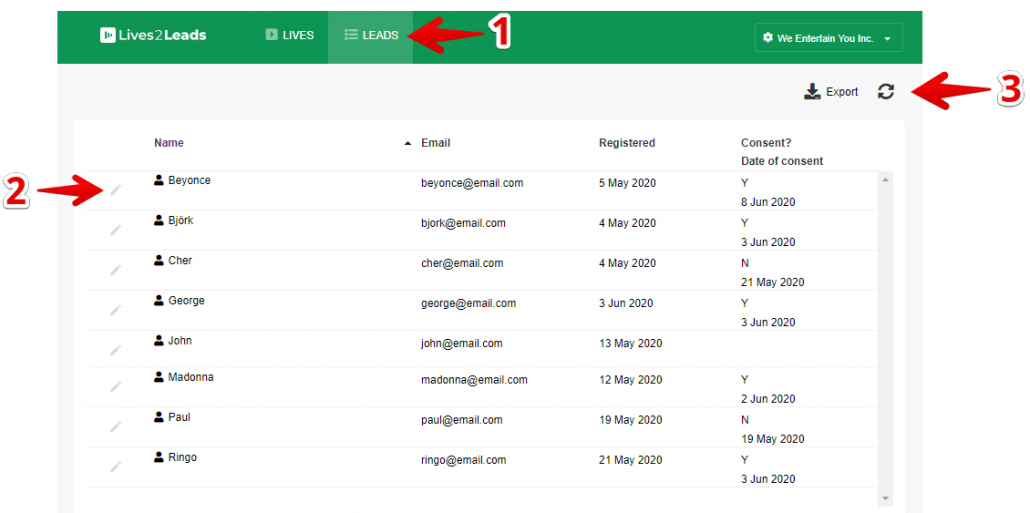
This article will show you exactly where to find your leads and how to work with them.

There are TWO different types of Leads Lists in Lives2Leads:

  • Global Leads List – A list of ALL leads collected across ALL Live Events
  • Individual Live Event Leads Lists – A list of leads collected for a single Live Event

GLOBAL LEADS LIST

  1. To find your Global Leads List, click on “LEADS” in the main menu
  2. You can click the pencil icon to edit the details of any Lead on your list
  3. There are two actions available for your list:
    • You can use the Export option to download a CSV file of your Leads List for use outside of Lives2Leads.
    • There is also a “Refresh” option to reload your list at any time.

INDIVIDUAL LIVE EVENT LEADS LISTS

  1. To find your Individual Live Event Leads Lists, click on “LIVES” in the main menu, then click the ‘Edit’ icon to open the details for that event
  2. In the Event Editor, click to open the “LEADS” tab
  3. For each individual lead, there are two action options:
    • Pencil Icon: Click this icon to edit the details of any Lead on your list
    • Mail Icon: Click this icon to open the Email utilities to send a message to this specific lead
  4. There are three actions available for your list:
    • The “Send emails” option will direct you to the Email utility so that you can send a manually triggered email.
    • You can use the Export option to download a CSV file of your Leads List for use outside of Lives2Leads.
    • There is also a “Refresh” option to reload your list at any time.

This article will show you how Lives2Leads can help you communicate with your leads… on auto-pilot!

Step 1: Create / Modify Your Email Templates

Go to ‘Settings’

From the sidebar menu select ‘Email Templates’.

Here you can edit an existing template or click the “+ EMAIL TEMPLATE” button to create a new template.

Give your Email Template a name and Subject line.

Then add the content of your email.

PRO TIP: Use the “Placeholders” to merge personalized data into your emails automatically! For example, using the {{ lead.firstName }} placeholder will automatically place the first name of your lead into the email without you having to manually enter it for each email you send. You can find a full list of available placeholders at the bottom of the ‘Editing Email Template’ screen.

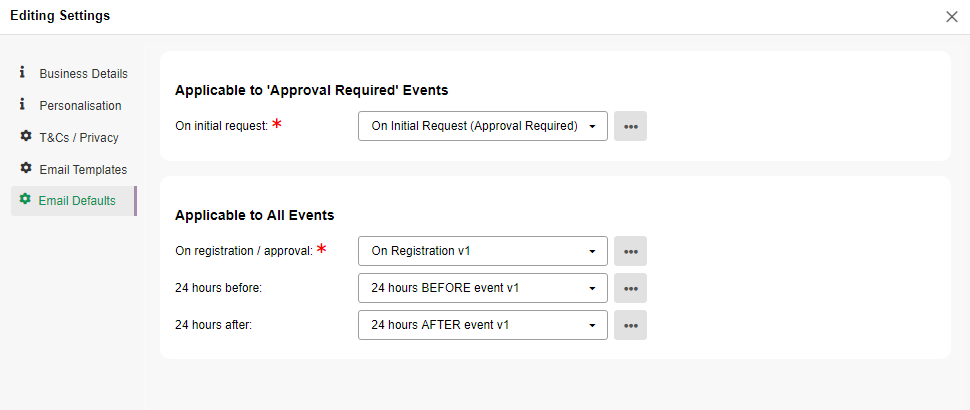
Step 2: Set your Email Defaults

Still in the ‘Settings’ section, select the ‘Email Defaults’ option in the left sidebar menu.

For each type of email, you can now select a default Email Template to use for each scenario. These can be overridden for each individual Live event you create (more on that below), but these options will be selected by default when you create a new event.

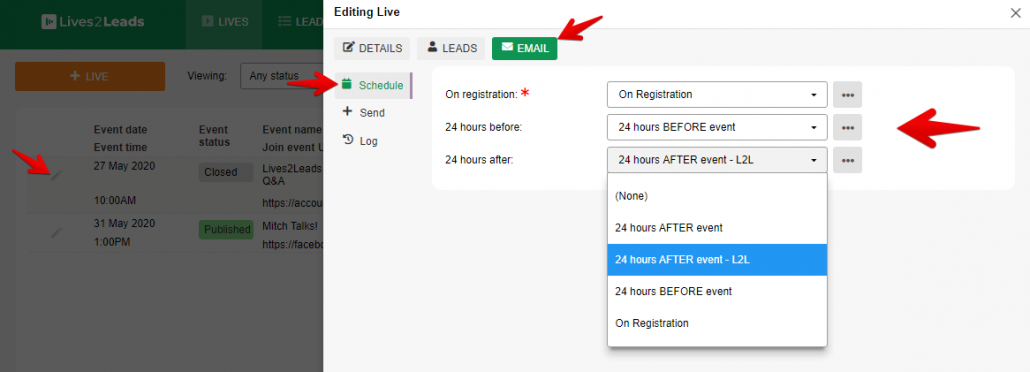
Step 3: Adjust your email schedule for an individual event

As mentioned above, you can select a custom email schedule for any individual Live event. Here’s how…

Open the Event Editor for the event you’d like to modify.

Select the “EMAIL” tab at the top.

Select the “Schedule” option in the left sidebar menu.

Using the dropdown lists, select the Email Template you’d like to use for each part of the schedule.

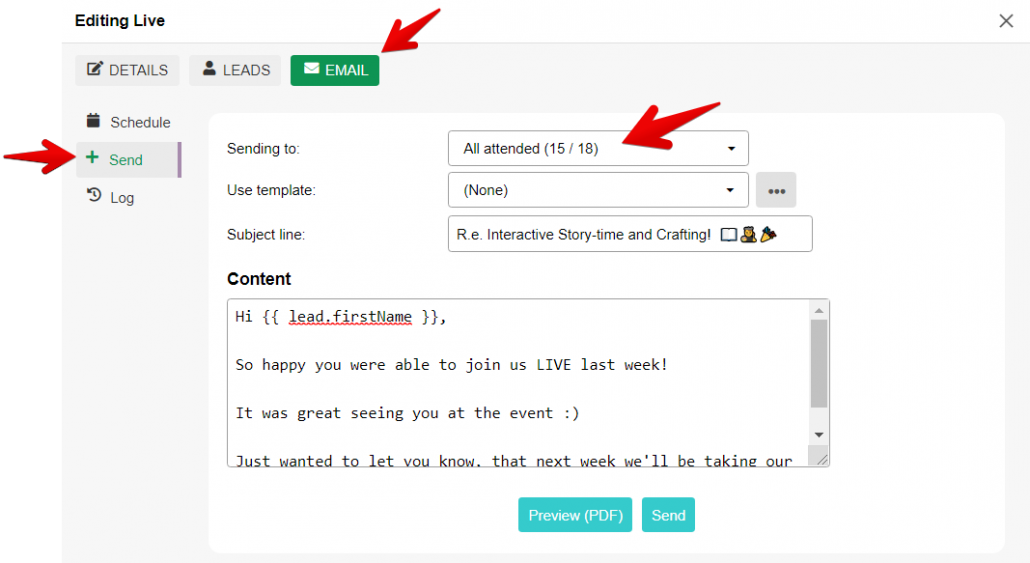
Step 4: Send Non-Scheduled Emails to Leads

You can also manually trigger emails to be sent to all of your leads for a particular event.

Again, open the Event Editor for the event you’d like to modify.

Select the “EMAIL” tab at the top.

Select the “Send” option in the left sidebar menu.

In this case you can use an Email Template or write a custom message to send.

In this article we’ll show you how to add/create a new Live event and it’s corresponding promo & registration page.

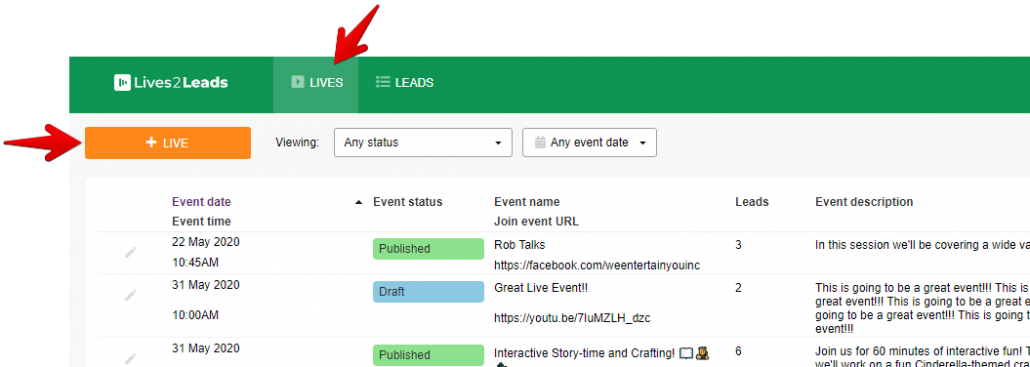
Step 1: Go to LIVES and click the orange + LIVE button

Step 2: Fill in the “DETAILS” section

We go through this tab section by section…

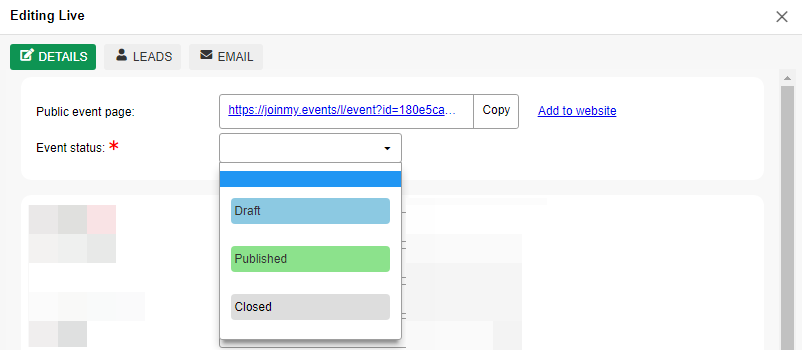
In this top section you’ll find:

  • Public event page: This is the URL you can use to promote your event and get people registering. Simply click the “Copy” button to quickly and easily grab this link.
  • Event status: You have three statuses to choose from:
    • Draft – not viewable
    • Published – can be shared and viewed
    • Closed – event promo and registration page is still published, however the registration section is replaced by a note saying the event is now “Closed” and cannot accept more registrants

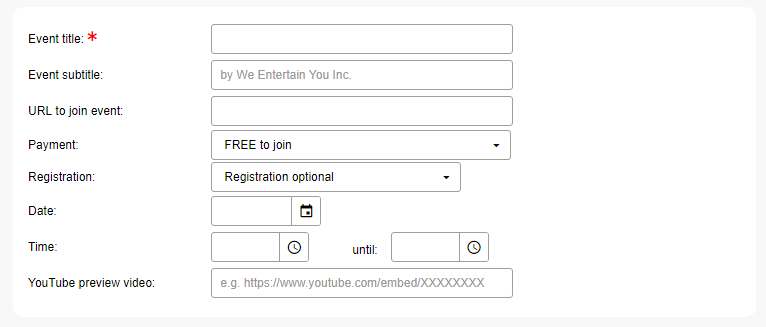
In this next section you’ll be adding details about your event, here you’ll find:

  • Event Title
  • Event Subtitle
  • URL to join event – this is the link you want your leads directed to at the time of your event (e.g. your Zoom link, Facebook page, etc)
  • Payment – here you can choose if the event is ‘FREE to join’ (which will display a big “FREE” label on your page) or ‘Payment Required’ (No label displayed on page). NOTE: For any events that require payment you must arrange payments outside of Lives2Leads with any system of your choice
  • Registration – there are 3 options here…
    • Registration Optional – connection details will be displayed publicly on your event pages
    • Registration Required – details are hidden and will be sent to your leads via email as soon as they register
    • Approval Required – details are hidden and leads must be manually approved by you before they can access your event

      ▶ NOTE: Learn how to use the different Registration options to add a huge layer of extra security to your events AND to even use Lives2Leads for your PAID events!
  • Date
  • Time – in your local time zone
  • YouTube preview video – if you have a preview of your event you want to share on your event pages, simply include the url of the youtube video you’d like to use

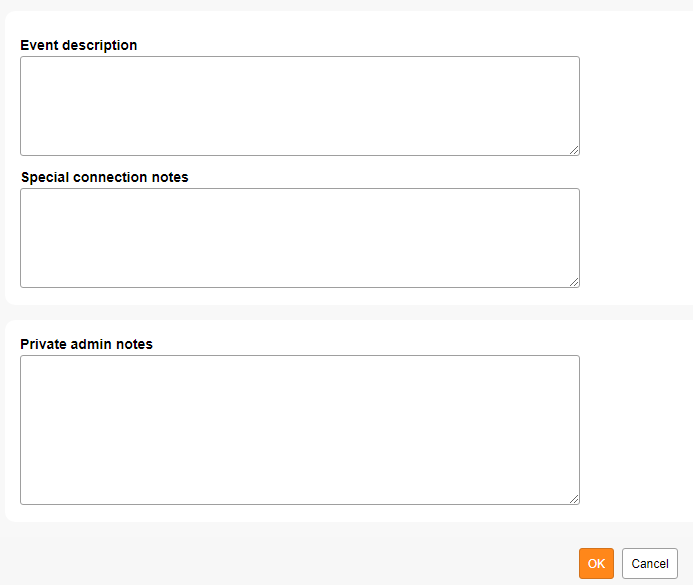
In this last section you have…

  • Event description – Here you can include a longer form description of your event. By default, on your event page, only the first line of the description will show and visitors will have a “more” button that expands the section to show the full details.
  • Special connection notes – If you have any special notes you feel are important to include along with the link to join your event to help guide your leads on how to join (for example, a password to join) this is a great place for it. NOTE: when applicable, these notes are not visible to leads until they’ve registered or are approved.
  • Private admin notes – These notes are just for you! They will never be seen by your leads.

Step 3: Click “OK” to save your changes

You may have noticed that at the top of your Live Event Editor there are two more tabs: “LEADS” and “EMAIL”.

Click here to learn more about the LEADS tab

Click here to learn more about the EMAIL tab

Adding your personal touches to your Lives2Leads account only takes a few minutes to do. Here are the steps to follow:

STEP 1: Go to Settings

Step 2: Fill in your ‘Business Details’

In the left sidebar menu, make sure ‘Business Details’ is selected. Then fill in all of your company information.

Step 3: Set your Personalisation details.

In the left sidebar menu, click on ‘Personalisation’ and add any/all personalised details/info you’d like to include on your event pages.

Step 4: Click ‘OK’ to save your changes

That’s all!

Here’s a breakdown of how each of the settings on the Business Details and Personalisation tabs effect the way your Live events are displayed to your clients.

To help you get started with your Lives2Leads account, we’ve created these two quick intro videos.

WATCH PART 1

WATCH PART 2

Sorry, we had some tech issues which forced me to record it in two parts… you’ll see what I mean when you get to the part when the video software started cloning me!!! 🐑🐑

Good luck setting up your account!